Tesla Service Mode: How to Access It and What It Does


Tesla ships a very detailed and comprehensive diagnostic and repair utility that is available in-vehicle, without requiring external plugs, adapters, or computers. It helps both Tesla and 3rd party technicians service Tesla vehicles far more efficiently.
Who Can Access It?
Unlike many other vehicle manufacturers, who require OBD-2 ports, service subscriptions, and other external utilities, anyone can access Tesla’s service mode. All owners and 3rd party technicians can access Service Mode by simply entering a special mode in the vehicle.
What Features Does It Have?
Service Mode is a special hidden app in the vehicle that provides various diagnostics tools that let you test various vehicle subsystems and components. Remember that if you’re exploring service mode on your own, you’ll want to be careful. Many of the features kept inside Service Mode are intended for debugging or repair – and not for the average user, however, Tesla provides a very user-friendly interface.
The options available will vary based on the vehicle and the systems available in that vehicle. For example, the Model S will have a diagnostic tool to troubleshoot its door handles, while the Model X will have one for its falcon-wing doors, but most tools will apply to a wide range of vehicles.
How to Access Service Mode
Tesla’s Service Mode is accessible via the touchscreen with just a few taps. Go to the vehicle controls button (the car icon), and tap the Software tab. After that, locate the vehicle model badge, (e.g. MODEL Y Long Range), directly beneath the vehicle image.
Tap and hold the word “MODEL” for 2 seconds, until you see a small ripple then let go. A menu and on-screen keyboard will pop up, prompting for an access code. Type the access code “service”.
Once you do this, it will bring up the SERVICE menu and a new app in the dock that’s red with a wrench. The entire display will also have a red border around it, indicating the vehicle is in Service Mode. Do NOT drive the vehicle in Service Mode, as many safety features are disabled while Service Mode is active.
How to Exit Service Mode
Once again, you can disable Service Mode from the primary display. If you’ve gone into another app, locate a bright red icon with a wrench in the dock or in the All Apps menu.
Once you bring up the Service Mode app, tap on the last icon in the left column. It’s red and shows a door with an arrow. Simply tap and hold this icon for several seconds to exit Service Mode. You’ll know once Service Mode is exited because the red border around the screen will be removed.
If you can’t find the Service Mode app, start Service Mode again by going to Controls > Software and holding the badge icon to enter Service Mode mode again. Once you’re back in the menu, tap and hold on the red exit icon.
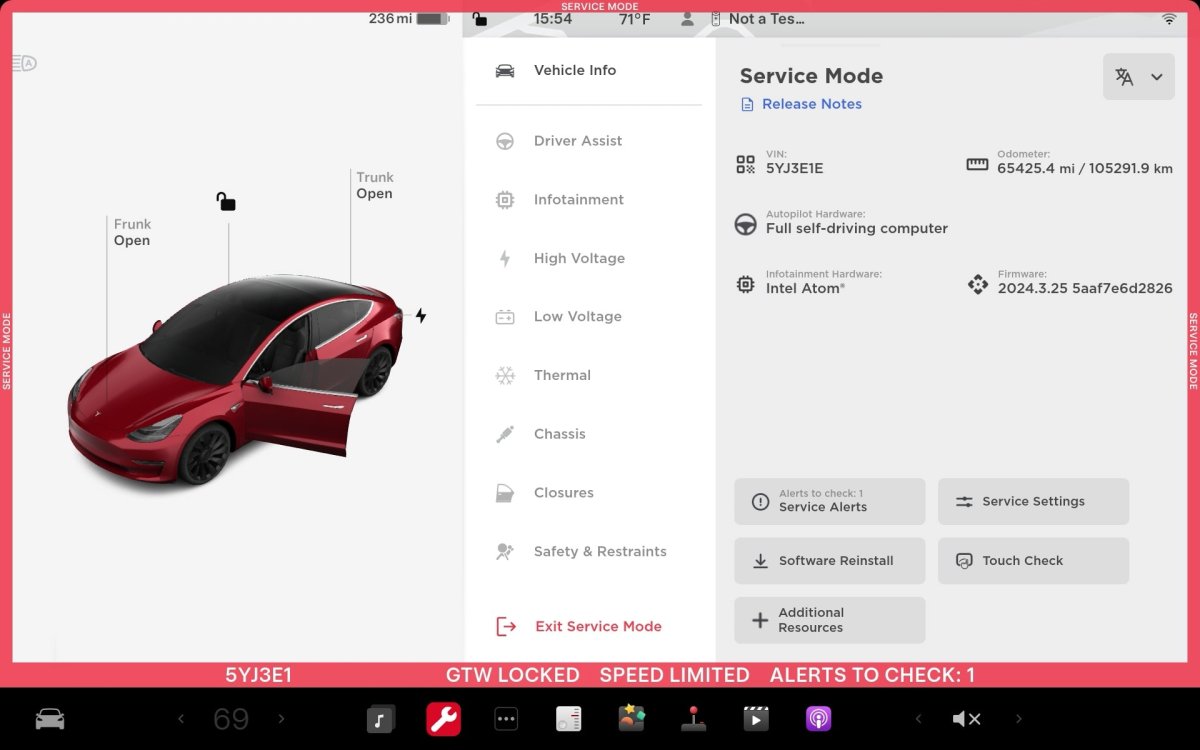
Vehicle Info
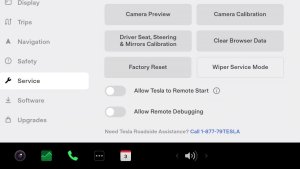
Tesla breaks Service Mode into various sections which we’ll go through below. The Vehicle Info section provides most of the same information available in the vehicle’s Software menu, showing you things such as VIN, Autopilot computer, software version and more. At the bottom, you also have access to Service Alerts, Service Settings, Software Reinstall, and a Touch Screen check to confirm your display is working correctly. There is also a button for Additional Resources, which takes you to your vehicle’s Service Guide online.
Driver Assist
This tab has two menus – Cameras and ECU. The Cameras menu provides nominal information on the vehicle cameras, including pitch information – useful for technicians working on the windshield. You can also clear camera calibration from here – but you can also do that within the regular vehicle menus and get a full preview of all cameras.
The ECU tab provides information on the vehicle's electronic control unit and GPS/GNSS.
Infotainment
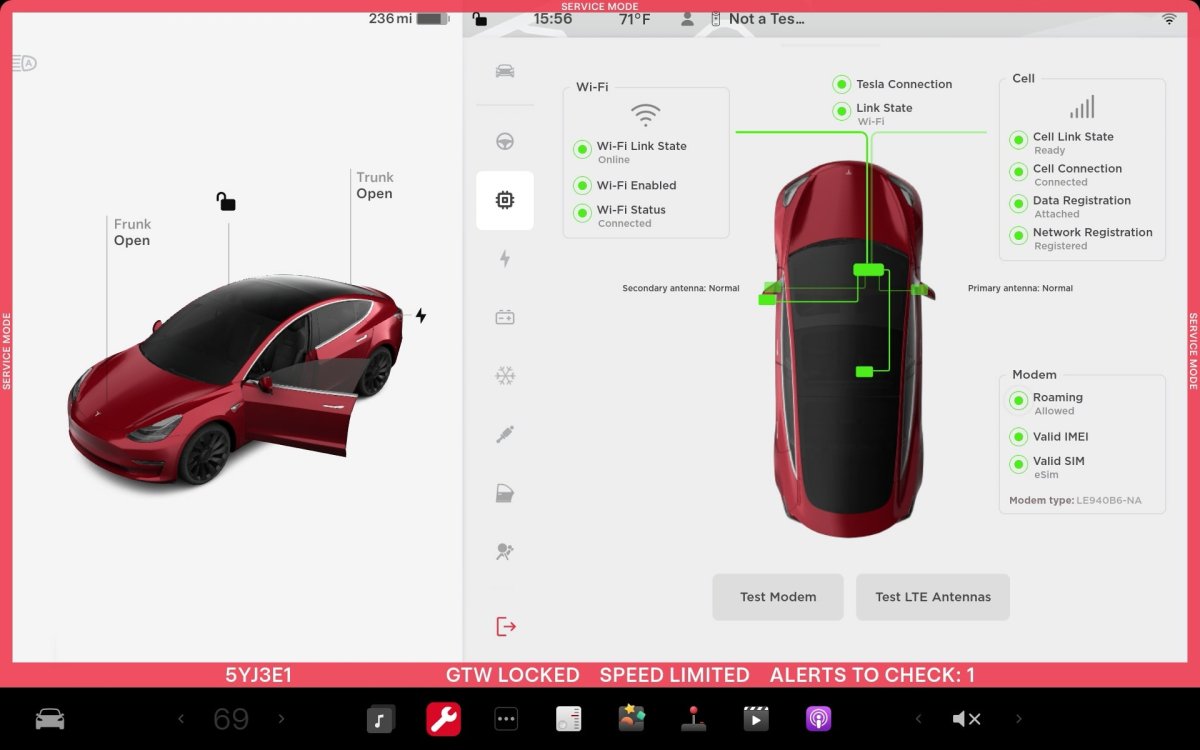
The Infotainment tab has two menus – Connectivity and Software. The Connectivity menu provides information on Wi-Fi and Cell connectivity and the status of the vehicle’s modems. You can run tests on either modem from here.
The Software tab provides information on the vehicle’s downloaded software and backup banks. Here, you’ll see that both the infotainment and Autopilot systems have 2 side-by-side banks – one keeps the previous update. Map info is also available here. These will be blank or display “—” while updating.
High Voltage
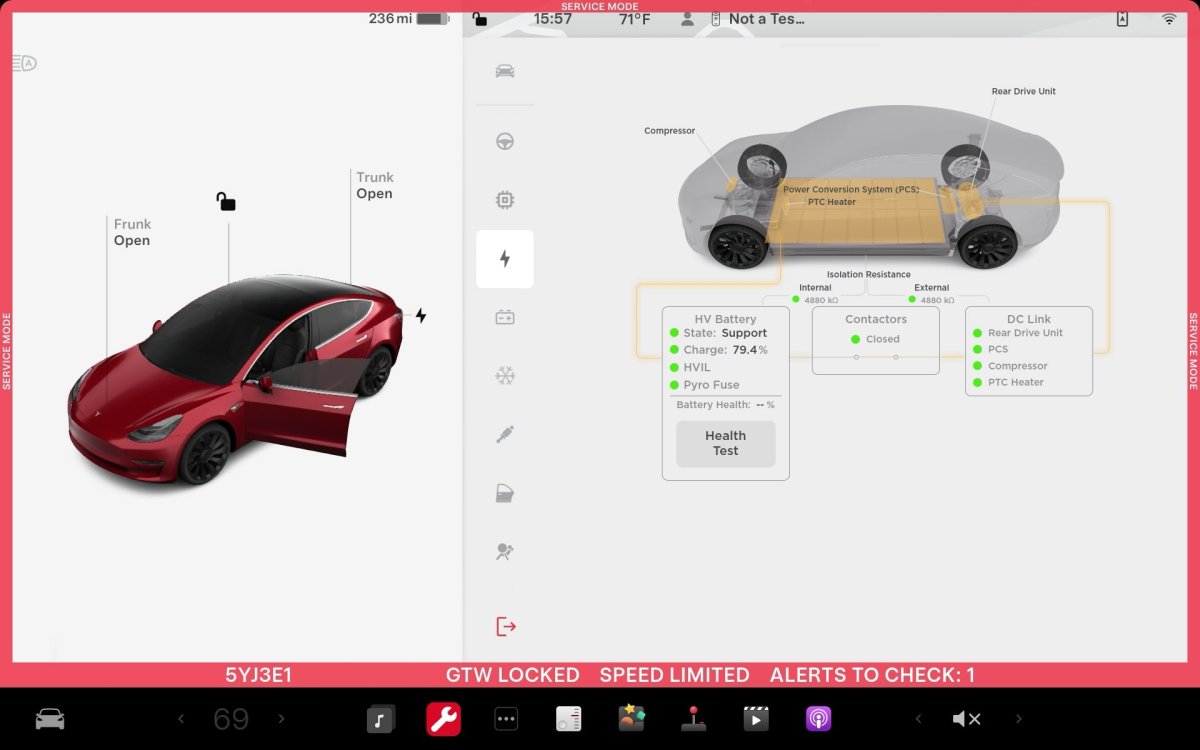
The High Voltage section is one of the most useful menus – it provides you with the ability to conduct Battery Health tests. The UI here provides information on the entire high-voltage system, including the battery, inverter, motors, vehicle charger, as well as the contactor and high-voltage pyro fuse.
The second tab in the high voltage menu displays the temperature of the battery and details on connected charging apparatuses.
Low Voltage
The Low Voltage system is all the other electronics in the car, and it provides information on the various low voltage components, including the 16v Lithium-Ion (or 12v Lead-Acid, for older vehicles).
This UI is drastically different in the Cybertruck – where it does not run on 16v, but rather 48v.
The last piece of the Low Voltage UI is Homelink. If you purchase Homelink – an add-on module – Tesla will install it for you. If you choose to install it yourself, you can commission the Homelink module through this menu. In the menu, you can also see how many devices are programmed and how many codes have been transmitted with HomeLink.
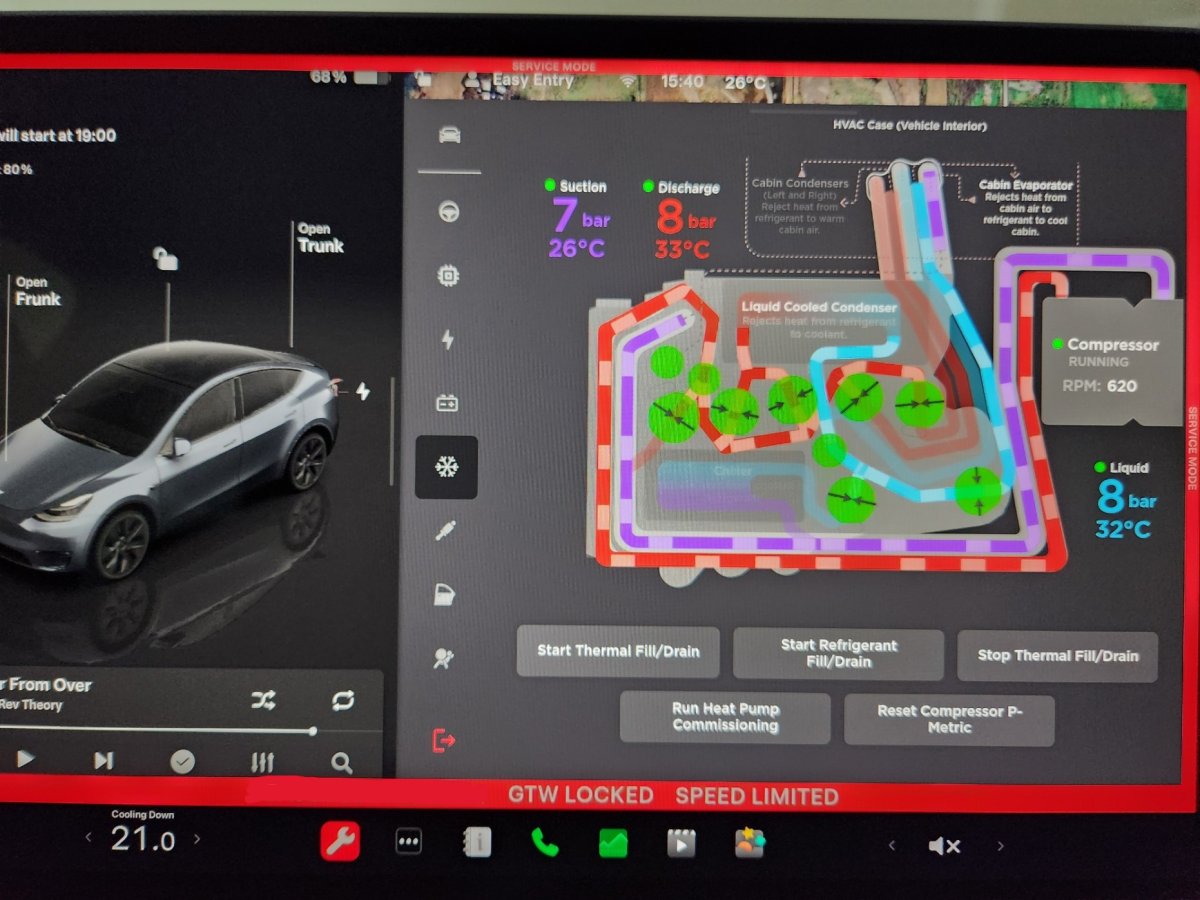
Thermal
The Thermal menu displays the status of the HVAC system, as well as the battery’s portion of the loop. It’s one of the coolest-looking menus since its animated.
It provides options for self-tests, as well as several options for the coolant and thermal pumps. This UI is for vehicles with heat pumps – legacy vehicles will have an A/C compressor and resistive heating.
This is also where you can view the status of your cabin and HEPA filters, and you can see if they need to be replaced.
Chassis
The Chassis menu provides you with steering options – and the ability to view or adjust your steering wheel offsets, look at suspension information on the Model S and X, re-calibrate the steering column, and confirm each of the buttons on the steering wheel and its stalks are working as expected.
It also provides you with some details on the vehicle’s brakes – showing some test and brake bleed options. An option for Brake Burnishing option is also available here.
Closures
The closures menu shows the status of windows, or automatic doors as well as the status of the front and rear defrosters. You can recalibrate each window and confirm it’s working properly. On the Model S it displays information on the automatic door handles, on the Model X it has a test for the gull-wing doors and for the Cybertruck you can test the tonneau cover.
Safety & Restraints
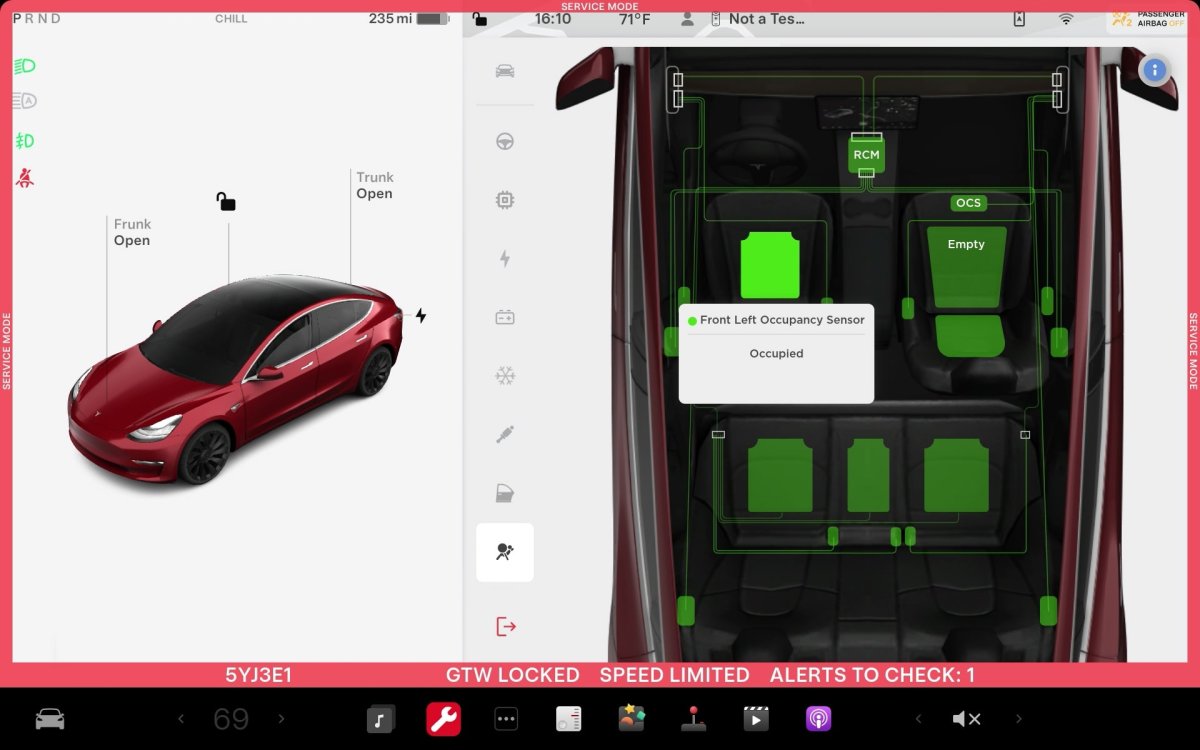
This menu simply displays the status of airbags, seat restraints, occupancy sensors and the pyro fuses in them, letting you confirm that each item is working properly and doesn’t have any faults.
Service Mode+ and Toolbox3
Of course, Tesla does have their own way of getting even more data than what is provided in Service Mode, through Service Mode+ and Toolbox3 – a subscription-access service similar to other vehicle vendors.
Service Mode+ is an additional set of tools that are internal to Tesla and require a Toolbox3 setup and subscription to access. It provides further information to fleet owners, collision centers, and Tesla technicians to diagnose and repair vehicles, as well as providing the capability to easily enable or disable Service Mode on vehicles remotely.
Toolbox3 is a subscription service that Tesla offers 3rd-party technicians and collision centers for around $3,000 per year or a hefty $500 for 30 days. Toolbox3 is installed on a computer and uses a special vehicle interface cable connected to the vehicle. If you’re a technician looking for details on how to set up or use Toolbox3, Tesla’s Online Service Manuals provide a per-vehicle and per-hardware spec guide on how to set it up.


![Tesla Software Update 2025.26: Grok, Light Sync, Audio Presets and More [VIDEO]](https://www.notateslaapp.com/img/containers/article_images/tesla-update/light-sync-update.jpeg/e84ab2f1fe12f493a75927db105a9586/light-sync-update.jpg)


_300w.png)