How to Check If Tesla has Garage Door Opener and How to Program It


Teslas have the ability to automatically open your garage door as you’re approaching your home. They can also automatically close it as you’re leaving.
They do this by combining the GPS signal with the HomeLink module that opens your garage door.
How to Tell If Your Tesla Has HomeLink

All Teslas are capable of opening garage doors using HomeLink, however not every Tesla comes equipped with the HomeLink module.
If you have a Model S or Model X, then your car already has the capability to open your garage door.
If you have another model, then whether it’s included in your car will vary. Model 3s included HomeLink only up until Spring of 2019. It then became an option that would be installed after delivery through Tesla service. All Model Ys do not have it installed unless it was installed after delivery.
However, the easiest way to tell if your car has a garage door opener is to check on the car’s display. You can go to Controls > Software then tap on Additional Vehicle Information.
This will bring up a screen that will display several important details about your vehicle and the hardware it includes.
The screen will display which full self-driving computer hardware is installed, your infotainment processor and more. It will also display whether you have the HomeLink garage door opener hardware installed.
Next to ‘Garage door opener’, you will either see ‘Not installed,’ or ‘HomeLink 5 (Opt 2).’ The number may vary, but it will mean that you have the HomeLink module installed and your car is capable of opening garage doors.
Program HomeLink Garage Door Opener
If you have a garage door opener in your Tesla, then you can program the car to automatically open the garage door when you pull up to the house.
You can also operate the doors individually through the car’s interface and even operate the main garage door through the Tesla app.
To program your car you’ll need the remote that came with your garage door opener, or easy access to the garage door motor in your garage.
If you’re programming the car using the button on the garage door opener motor, make sure you have plenty of space and a good step ladder because you’ll need to complete the operation in a certain amount of time. If someone is available to help, that will make the process much easier.
To get started you’ll tap on the HomeLink icon along the top of your Tesla’s screen that looks like a house with an arrow then tap HomeLink Settings.
This brings up the HomeLink screen which allows you to add various garage doors or compatible accessories such as lights or gates.
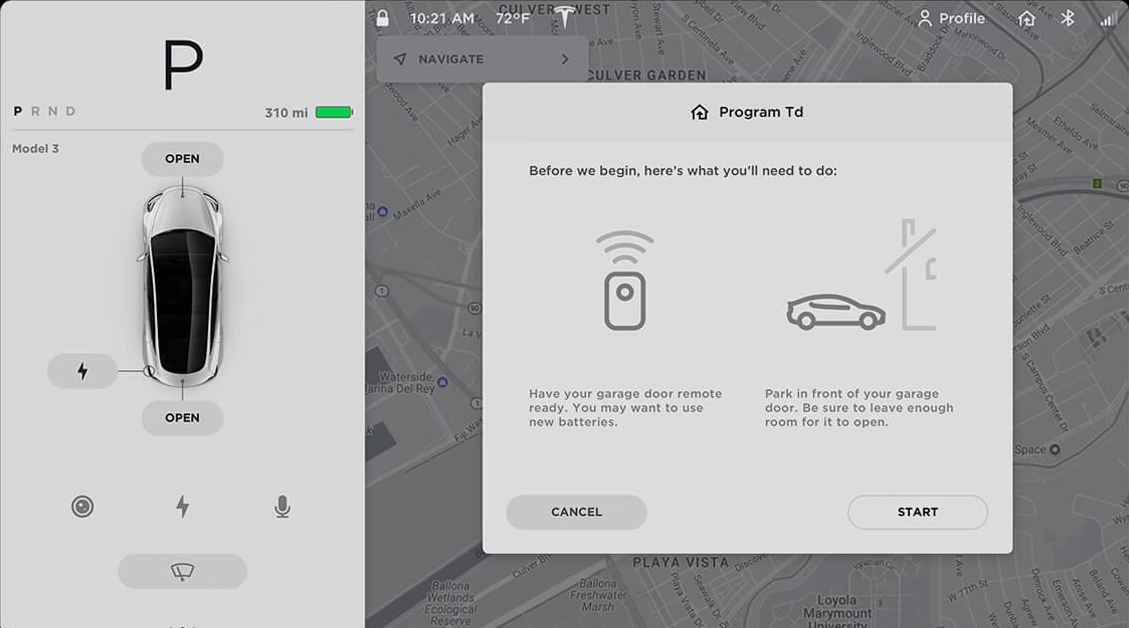
Start by tapping on Add New HomeLink then enter a name for this garage door, such as ‘Left Garage’ and then tap Create HomeLink.
Standard Mode or D-Mode
You’ll next be presented to set the HomeLink transmit mode. The mode you need to pick will depend on your location and method you’re using to program your car.
Standard Mode - This is the most common mode. If you’re unsure of which to use, you should start with this one, as it’s the simplest to set up. This option requires the use of your garage door remote.
D-Mode - D-mode is usually used in North America. You’ll want to use D-mode if you’re using the ‘Learn’ or ‘Smart’ button on your garage door opener motor.
UR-Mode - UR-mode is similar to D-mode but it’s a standard that’s usually found in Europe, the Middle East and Asia. It’ll also require you to use the ‘Learn’ button on your garage door opener motor.
Set your preferred mode and tap Set Mode.
Next, you’ll want to make sure your car is parked in front of your garage. The car uses this location to determine when to open your garage door when arriving home.
Later you’ll then be able to set how many feet before reaching this location should the car send the signal to open your garage.
Programming With Standard Mode
Get ready to program your car and tap Start. You’ll now want to go outside of your car with your garage door remote and point it at the front bumper closer to the passenger side.
Now press and hold the button that opens your garage door on the remote and keep it pressed. It can take up to 30 seconds to program. Your car’s lights will flash when it’s complete. Keep in mind that your garage door will open or close when you do this, so make sure there is nothing in the way.
Once you see your headlights flash, that means the car was successfully able to record the signal from your remote.
When you go back in your vehicle you should see that the recording was completed and you’re prompted to tap next to continue.
If you’re using Standard Mode, the next step will vary depending on whether your remote is QuickTrain compatible or not.

If your remote is QuickTrain compatible or doesn’t use a rolling code then you can tap Continue, if it’s not either of those, then you’ll be required to press the ‘Learn’ button on your garage door opener motor.
If you’re not sure, you can try pressing continue and see if HomeLink works. If it doesn’t work then you know your remote is not QuickTrain compatible.
Programming With D-Mode or UR-Mode
If you’re using D-Mode or UR-Mode to program your car you will need easy access to the garage door opener motor.
The car will ask you to press the Learn or Smart button on the garage door motor. It’ll be a small button that may be behind a cover or door. It’s usually a bright color such as orange, red, yellow or purple, but it can be any color.
After pressing the button you will need to go back to the car in a short period of time and tap continue. This is to prevent unauthorized use of your garage door.
Testing the Button
After programming your garage door the car will ask you to test it.
The car will have you test the garage door button in the car to see if it works and you’ll be given a chance to go back and choose a different option if it didn’t work the first time.
Once you have your garage doors opening from the car and tap save, you can set various options for the garage door.
Auto Fold Mirrors
This option will cause your car to fold its mirrors right before arriving at your garage. Keep in mind this may make backing out of your garage a little more difficult. Only use this option if you need to.
Auto Open When Arriving
Teslas will combine your GPS signal with your HomeLink transmitter and auto open your garage doors as you’re approaching your house.
This is a really convenient feature and I’d recommend having it on as long as your garage door has the safety sensors at the bottom that will prevent it from closing if anything is in the way.
You can also choose the number of feet away from your garage when the car should send the signal to open it.
It’s nice to have your garage door fully open before you get to it so that you don’t need to stop and wait. However, the number of feet that is right for you will depend on your garage door opener and how far away it could receive a signal.
I’d also recommend having your garage door in view so that for those rare times when you come home and the garage door is already open. This will cause your car to send another ‘open’ signal, causing your garage door to start closing.
It's important to understand that the car has no way to know whether your garage door is open or closed, and unfortunately HomeLink simply sends an "open/close" signal, which causes the garage door to open if it’s closed or close if it’s opened. Some caution is necessary, but the feature works well, especially when you’re arriving home.
Tesla recommends only using the auto-open or auto-close features when your garage door is installed with safety sensors along the bottom.
Keep in mind that the car determines the location of your garage door based on where your car was when you programmed the garage door. The location can be reset at any time.
Auto Close When Leaving
This is the opposite of ‘Auto Open when Arriving’. Your car will automatically send a signal to close your garage door when you’re leaving home.
We do need to be cautious with these features as they’re not discrete open and close signals and they just tell the garage door to switch position.
Reset Location
If you weren’t in front of your garage door when you programmed it, then your car has the wrong location for your garage door. Choosing ‘reset location’ when in front of your garage door will cause the car to change the location of your garage to its current position.
You’ll need to do this for each garage door.
Chime for Auto-Open and Auto-Close
On the HomeLink settings screen you can also set whether you’d like the car to chime before auto opening or auto closing the garage door.
This will have the car make a short ding sound before auto opening or auto closing your garage doors. It’s a little reminder that the garage door is open to move. It also gives you a chance to cancel the auto opening or auto closing procedure before it starts. You’ll see the HomeLink menu come up with a cancel button when this happens.
Limited to 3 Garages or Devices
The HomeLink module that Tesla uses is limited to three HomeLink devices. Unfortunately, this is a limitation of the module itself and not something that Tesla can change.
Add or Install Garage Door Opener in Your Tesla
If you have a Tesla Model 3 or Model Y that does not have the garage door opener, then you can purchase it separately directly from Tesla.
Unfortunately, it can’t be purchased when you buy the car and it needs to be bought and installed by Tesla service after delivery.
The cost for the parts and installation are $325.
If Tesla offers mobile service in your area then it's a convenient and painless process.
Set Which Garage Door Opens In App
In the Tesla app there is a HomeLink icon that will open your garage door. Unfortunately, this button can only be assigned to one garage door.
There is no way to have your Tesla open the other garage doors programmed in the vehicle, however you can pick which garage door to open when you press the HomeLink icon in the Tesla app.
The following procedure requires you to have Enhanced Autopilot (EAP) or FSD. If you go in your car and go to Controls > Autopilot then tap on Summon you’ll be presented with Summon details.
To choose your garage door, tap HomeLink then pick your garage door. You can then turn HomeLink off again. Keep in mind that if you use Summon with HomeLink enabled then you are telling the car which garage door to open before backing out of the garage.
If you do not have EAP or FSD, then you may have to change the order of your garage doors in order to change the one that opens when pressing the HomeLink icon.


![Tesla Updates Robotaxi App: Adds Adjustable Pick Up Locations, Shows Wait Time and More [VIDEO]](https://www.notateslaapp.com/img/containers/article_images/tesla-app/robotaxi-app/25-7-0/robotaxi-app-25.7.0.webp/4ac9ed40be870cfcf6e851fce21c43b9/robotaxi-app-25.7.0.jpg)