


Fari anteriori adattivi

I fari abbaglianti ora si adattano per ridurre l'abbagliamento di altri conducenti e ciclisti. Con il rilevamento degli altri utenti della strada e la regolazione selettiva dei singoli pixel dei fari, gli abbaglianti possono venire accesi più spesso per migliorare la visibilità notturna.
Per accenderli, vai a Comandi > Luci > Fari anteriori adattivi.
Telecamera per punto cieco sullo schermo del conducente
Il feed della telecamera per punto cieco è ora disponibile sul quadro strumenti.
Vai a Comandi > Display > Telecamera per punto cieco automatica e seleziona Schermo del conducente.
Piani di viaggio alternativi
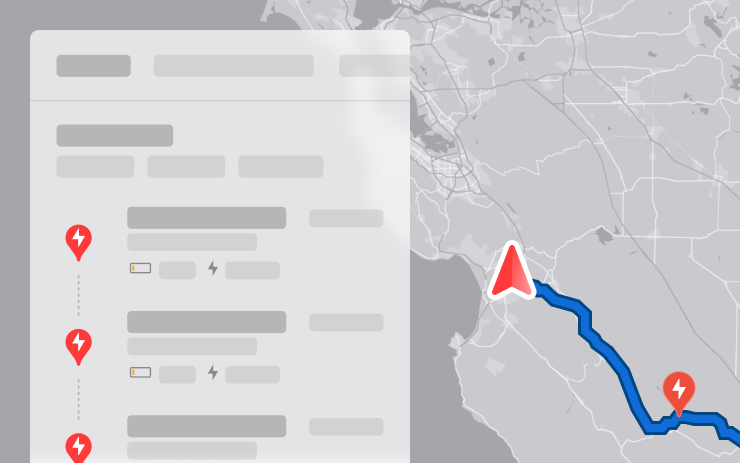
Sono ora disponibili diversi piani di viaggio tra cui scegliere, per soddisfare al meglio le tue esigenze.
- Più veloce: offre il percorso più veloce.
- Migliori servizi: dà priorità alle fermate vicino a ristoranti, negozi e servizi igienici aperti e con buone recensioni.
- Meno fermate: riduce al minimo le fermate per la ricarica.
Evita autostrade

La navigazione ora può evitare le autostrade quando possibile, fornendo un percorso alternativo che aggira le strade principali.
Vai a Comandi > Navigazione > Evita autostrade.
Aggiornamento dashcam e registrazione telecamera laterale

Le telecamere laterali del veicolo (montante B) verranno ora registrate sia sulla dashcam che sui video sentinella. Anche l'app Dashcam Viewer è stata aggiornata con una vista a griglia, rendendo più facile l'accesso e la revisione delle registrazioni.
Salva altezza vano posteriore in base alla posizione

Personalizza l'altezza di apertura del vano posteriore e salvala come predefinita o per un luogo specifico, come il tuo garage. Per impostare un'altezza, metti in pausa il vano posteriore mentre è in movimento utilizzando il touchscreen. In alternativa, regola manualmente l'altezza desiderata, quindi tieni premuto il pulsante di chiusura del vano posteriore finché non senti un segnale acustico.
Per impostare l'apertura del vano posteriore esistente all'altezza predefinita di fabbrica o per cancellare eventuali posizioni salvate, vai a Comandi > Assistenza > Rimuovere posizioni salvate.
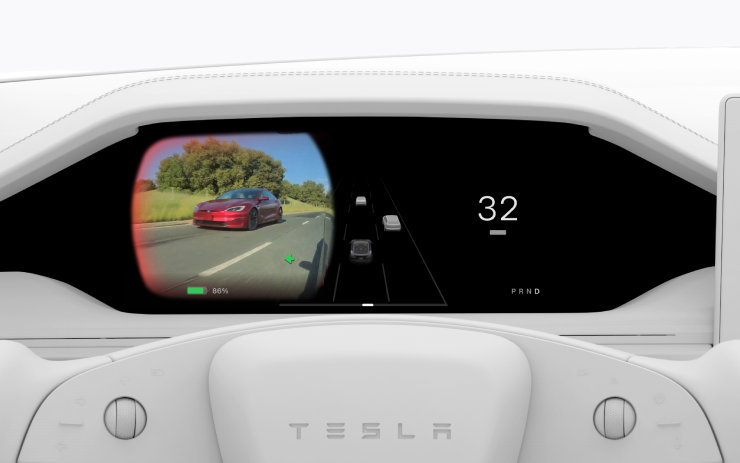
Lane Departure Avoidance
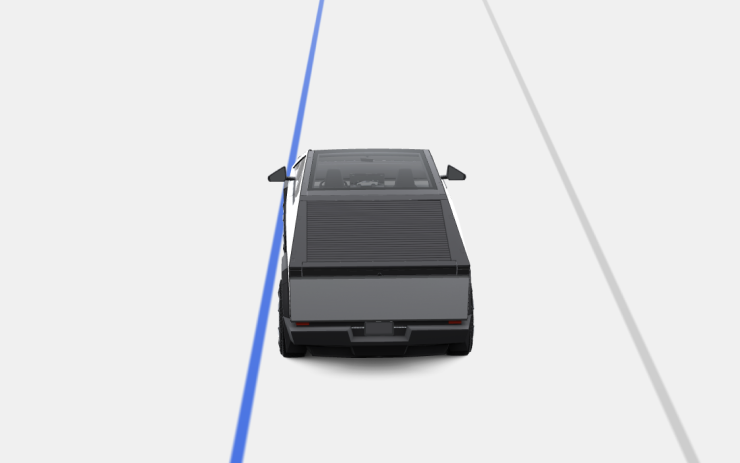
This feature warns you if your vehicle drifts near or out of your lane. With this update, it can now also assist you. When enabled, a blue indicator line will appear on the touchscreen, showing which lane marking is being crossed. You can customize Lane Departure Avoidance in Controls > Autopilot > Lane Departure Avoidance.
Additionally, you can enhance safety by preventing unintended lane departures with Emergency Lane Departure Avoidance. Go to Controls > Autopilot > Emergency Lane Departure Avoidance.
Save Frunk Height Based on Location

Customize the opening height of your frunk and save it as the default or for a specific location, such as your garage. To set a height, pause the frunk while it's moving using the touchscreen. Alternatively, manually adjust to your preferred height, then press and hold the frunk exterior button until you hear a chime.
To set your existing frunk opening to the factory default height, or to clear any saved locations, go to Controls > Service > Remove Saved Locations.
Comfort Drive Mode in Autopilot

Your vehicle will now automatically transition to Comfort Drive Mode when Autopilot is engaged. This setting is enabled by default.
To disable, go to Controls > Dynamics > Use Comfort Drive Mode in Autopilot.
Lingue della tastiera
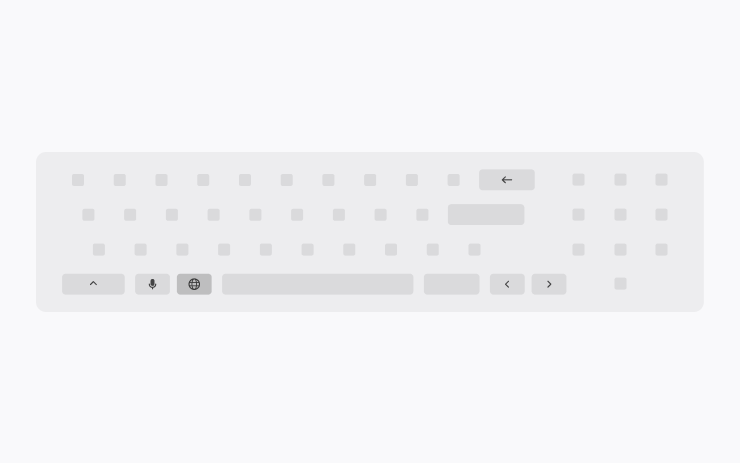
Passa facilmente da un metodo di inserimento della lingua all'altro sul touchscreen. Per aggiungere tastiere, vai a Comandi > Display > Tastiere. Per passare da una all'altra, tieni premuta l'icona globale sulla tastiera e seleziona la tastiera desiderata.
Tenere acceso l'accessorio

Utilizza o carica i dispositivi tramite le prese a bassa tensione e le porte USB dopo essere uscito dal veicolo, purché la carica della batteria sia superiore al 20%.
Se abilitate, queste porte rimangono alimentate anche se non sei presente e il veicolo non è in uso. Tieni presente che ciò potrebbe aumentare il consumo energetico del veicolo, anche se non è collegato alcun dispositivo.
Vai a Comandi > Ricarica > Tenere acceso l'accessorio.
Aggiornamenti minori

- Quando si visualizza la pagina di una stazione di ricarica, nella parte inferiore vengono visualizzati ristoranti, bar e negozi raggiungibili a piedi.
- I risultati della ricerca sui media sono ora filtrati in base alle fonti, fornendo un accesso più rapido e semplificato ai contenuti.
- Scorri facilmente i preferiti di Sirius XM toccando il pulsante sul volante verso sinistra o verso destra.
- Accedi con il tuo account Amazon Music Free. Richiede Premium Connectivity o una connessione WiFi attiva.
- Ora puoi riprodurre in ordine casuale un'intera playlist di Apple Music che contiene più di 100 brani.
- Scopri il prossimo brano che verrà riprodotto nelle playlist di YouTube Music nella vista "Prossimo" del lettore multimediale.
- Nelle impostazioni di navigazione, puoi scegliere di mostrare o nascondere sulla mappa i caricatori che non sono di proprietà o non sono assistiti da Tesla.
- Se l'hotspot è attivato, si collegherà automaticamente al veicolo non appena inizi a guidare, quindi non dovrai ricollegarti ogni volta.
- Le foto dei contatti vengono ora visualizzate per le chiamate in arrivo e nell'app Telefono del veicolo.
- Questo aggiornamento include importanti correzioni di sicurezza e miglioramenti.
Improvements to Heated Steering Wheel

If the steering wheel heater is set to Auto, the steering wheel will now heat up based on the cabin temperature, even if the climate system is set manually.
Previously, the climate system needed to be set to Auto for the steering wheel heater to turn on automatically.
Apple Music Improvements

There have been several Apple Music improvements. Besides shuffling an entire Apple Music playlist instead of just the first 100 songs, Tesla has also improved these other options:
- If you’re listening to one of Apple Music’s curated stations, such as Apple Music 1, the name of the song and artist will now be displayed in the music player instead of the name of the station.
- The latest Apple Music stations, including Apple Música Uno, Apple Music Club, and Apple Music Chill, are now selectable in your Tesla.
Language Support
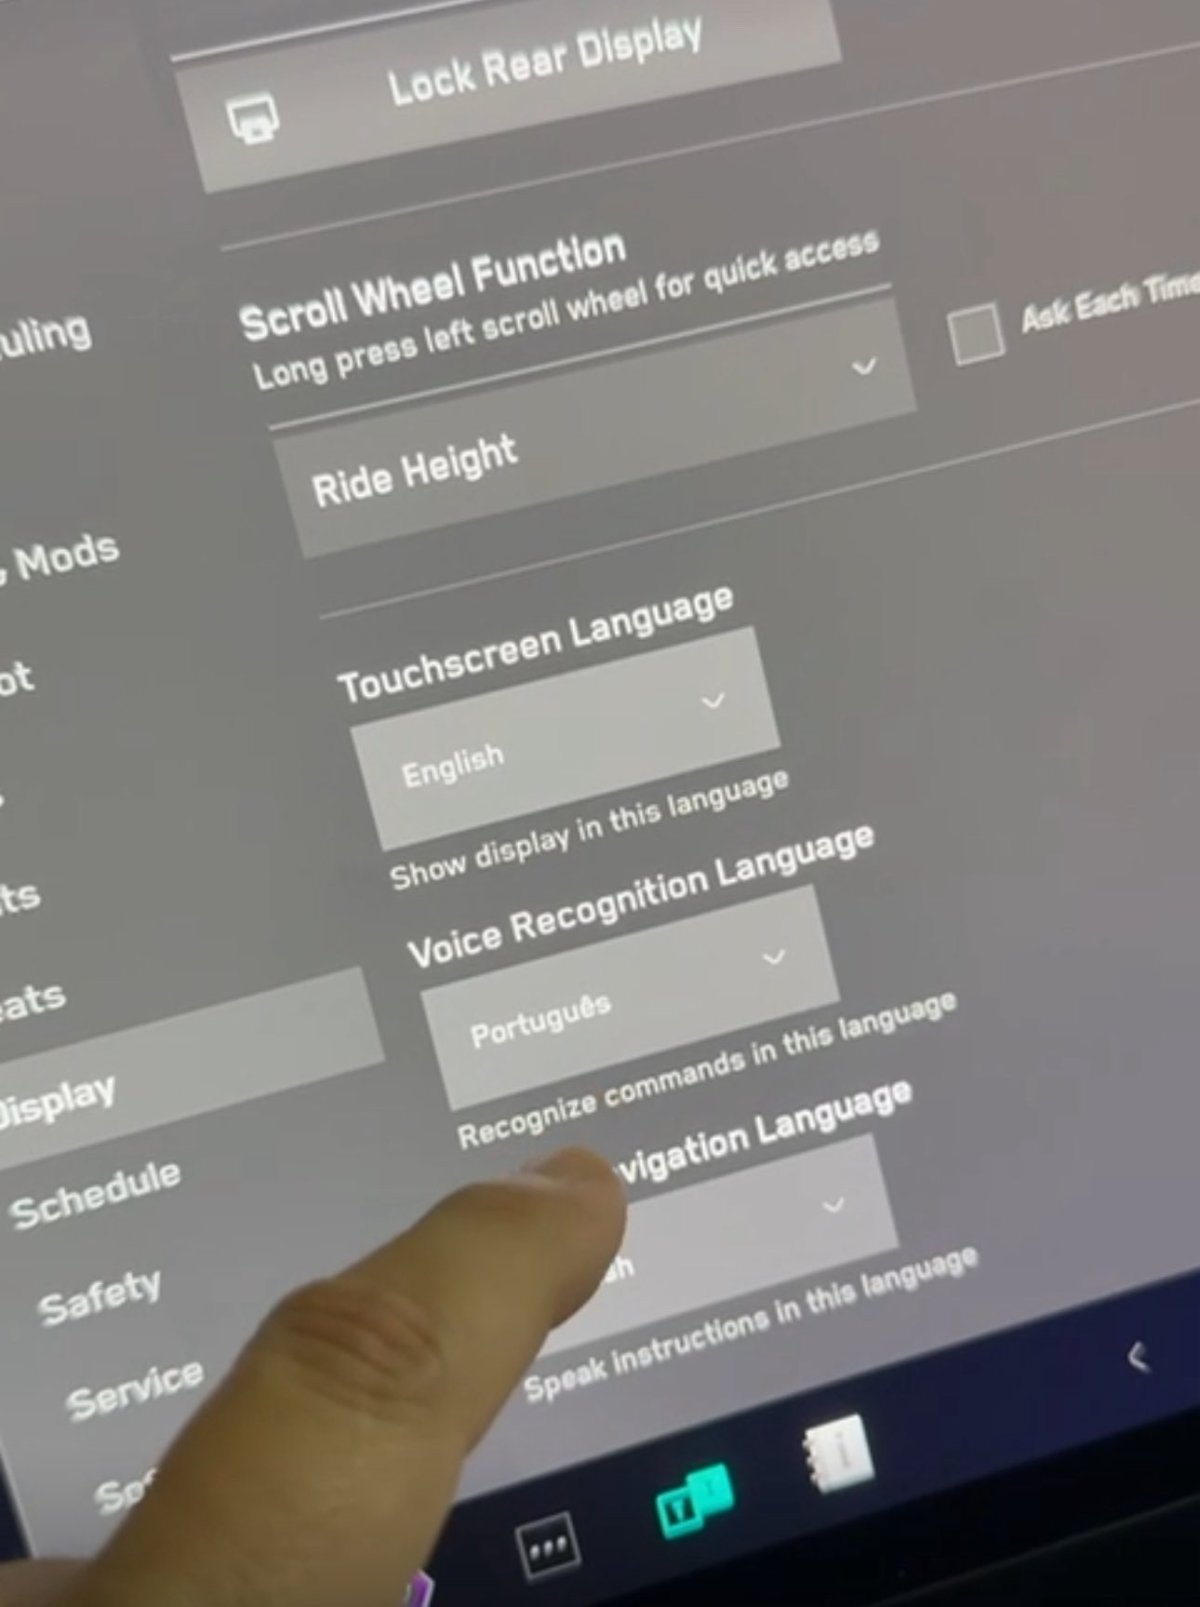
While other Tesla models support a variety of languages, the Cybertruck was limited to English. With this update, you can now switch the on-screen language, the voice recognition language and navigation language to options available in other Tesla models.
Note: Navigation languages are limited by your map region.
Sentry Mode Improvement

Sentry Mode automatically turns off if the vehicle’s battery falls below a 20% state of charge. However, with this update, Sentry Mode will now automatically come back on if the vehicle is plugged in.
Lane Departure Avoidance Updated to FSD

Tesla appears to be migrating core safety features from the legacy Autopilot stack to the newer FSD stack. Update 2025.14 added Lane Departure Avoidance (LDA) and Lane Assist to the Cybertruck—despite it not supporting Basic Autopilot, which these features were previously based on.
Instead, these features now appear to be based on FSD, which not only means that the Cybertruck can include them but that they’re also based on a newer and much better tech architecture that better understands the environment.
The visualizations have also been changed for these two safety features. Previously, when these features were activated, the visualizations would revert back to Autopilot.
Now, the visualization for LDA will feature a blue line on both sides of the lane marking you’re going over. These changes appear to only affect vehicles with FSD in North America for now. However, they apply to HW3 and HW4 vehicles.
Improved Dashcam Viewer

Although vehicles with HW3 are not receiving the B-pillar camera recording for Sentry Mode and Dashcam, they are receiving the improved Dashcam Viewer if they include the AMD Ryzen infotainment chip.
The updated Dashcam Viewer has several new features, including a new grid view that lets you view four cameras at once, making it easier to view what happened during the event.
The updated player now also includes buttons to jump back or forward in 15-second increments, as well as the ability to jump directly to the next clip.
The different camera views are now placed along the bottom instead of at each corner of the video.
Camera App
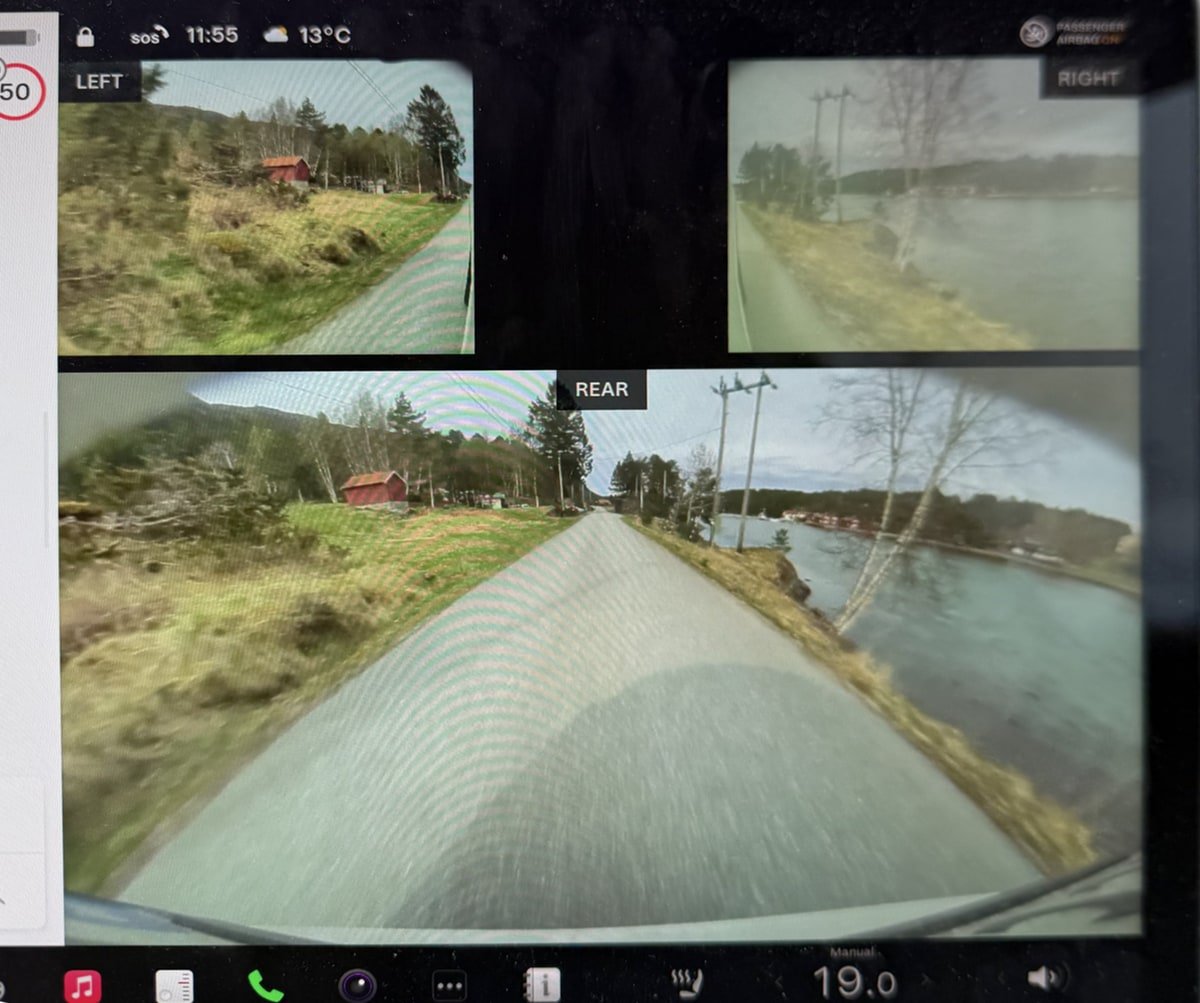
For HW4 vehicles, the Camera app has been updated so that the repeater cameras are now displayed at the top instead of the bottom. Each camera feed is also labeled so that users can more easily identify the rear, left, and right cameras.
In addition, the field of view for the rear camera is now wider, not only in the vehicle but also when viewing the rear camera through the Tesla app.
Speedometer

In regions where km/h is used, Tesla has updated the speedometer to properly reflect km/h instead of KM/H.
Sentry Mode Menu
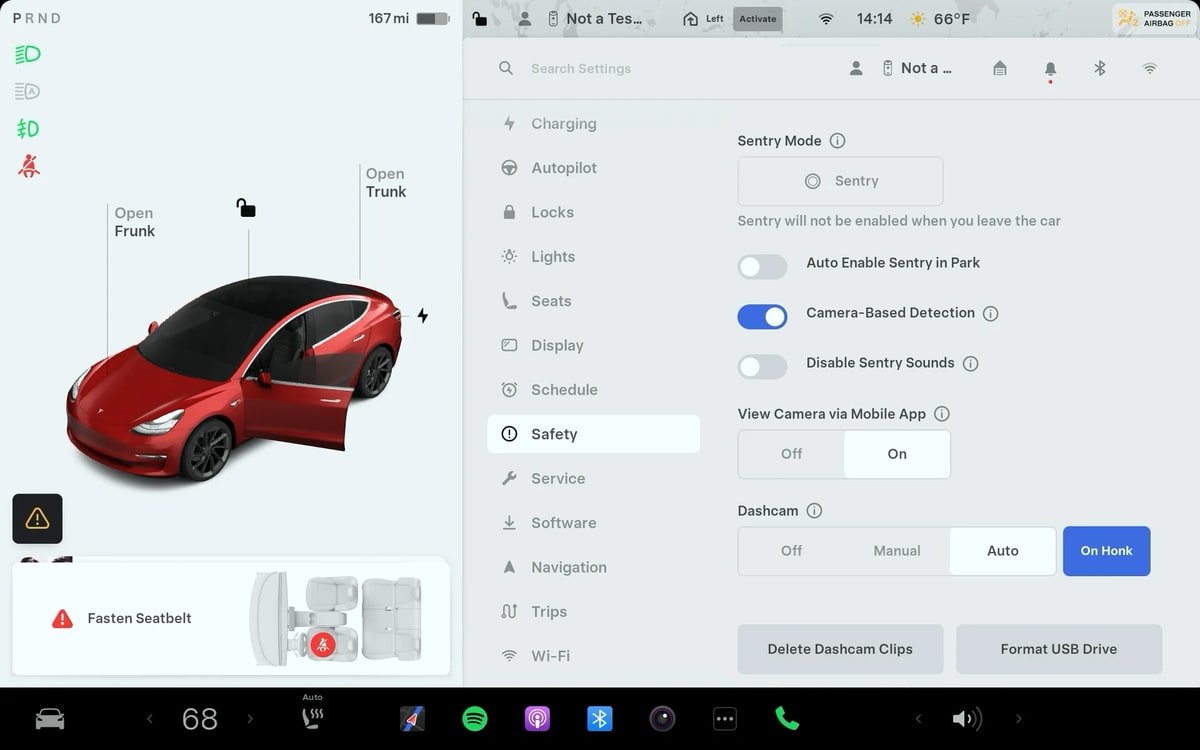
The Sentry Mode menu has been updated to make it easier to turn on Sentry Mode for a one-time use.
Under Controls > Safety, Tesla now has separate controls to turn on and off Sentry Mode one time (the button with the Sentry Mode icon) and the option to enable Sentry Mode whenever the vehicle is parked.
The exclude home, work and favorites options only show up when you enable Sentry Mode when parked.
Service Mode Release Notes
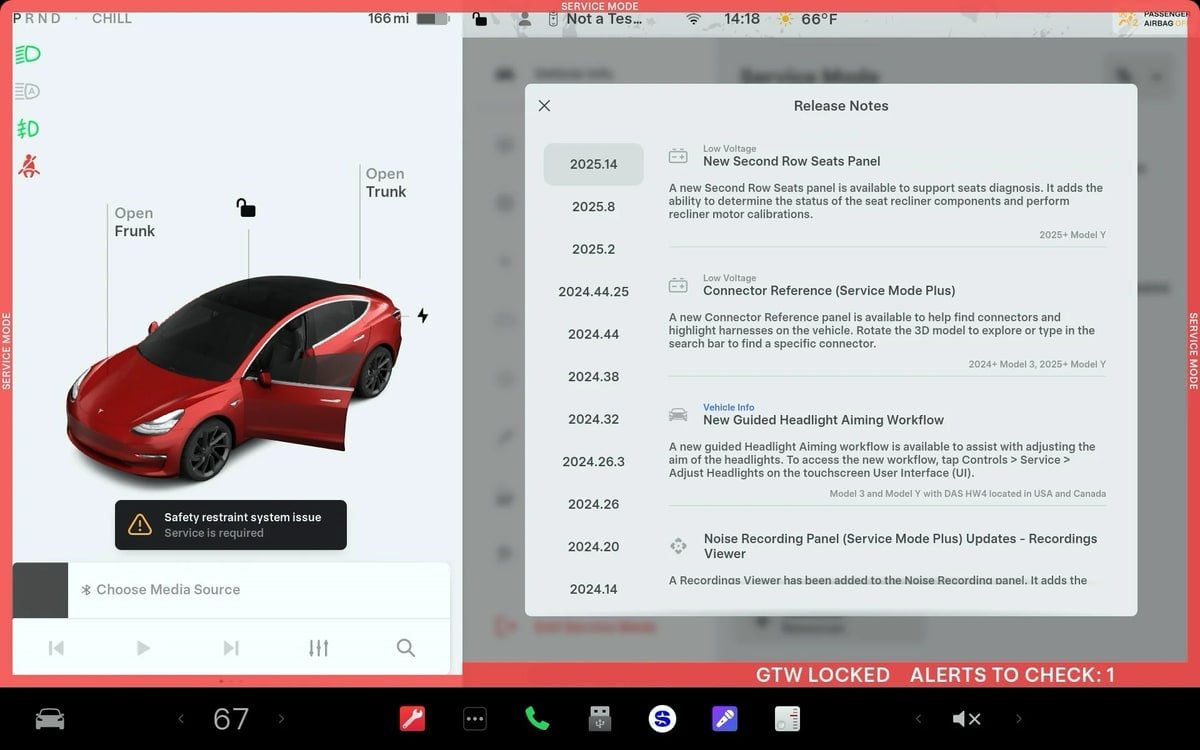
New Second Row Seats Panel
A new Second Row Seats panel is available to support seats diagnosis. It adds the ability to determine the status of the seat recliner components and perform recliner motor calibrations.
Models: 2025+ Model Y
Connector Reference (Service Mode Plus)
A new Connector Reference panel is available to help find connectors and highlight harnesses on the vehicle. Rotate the 3D model to explore or type in the search bar to find a specific connector.
Models: 2024+ Model 3, 2025+ Model Y
New Guided Headlight Aiming Workflow
A new guided Headlight Aiming workflow is available to assist with adjusting the aim of the headlights. To access the new workflow, tap Controls > Service > Adjust Headlights on the touchscreen User Interface (Ul).
Models: Model 3 and Model Y with DAS HW4 located in the USA and Canada
Noise Recording Panel (Service Mode Plus) Updates - Recordings Viewer
A Recordings Viewer has been added to the Noise Recording panel. It adds the ability to view and delete recordings that were created using the Noise Recording panel.
Models: Cybertruck
HVAC Panel Updates - Top-Down Cabin View and Thermal
Component Testing
A top-down cabin view and the ability to view the statuses of sensors, temperatures, temperature targets, and mass flows throughout the HVAC system have been added to the HVAC panel.
Models: Cybertruck
Falcon Door Panel Updates - Interactive Ultrasonic Sensor Diagnostic Procedure (Added in 2025.14.3)
An interactive diagnostic procedure has been added to the Falcon Door panel to support ultrasonic sensor false detection diagnosis.
Models: Model X


